

Zenith Z1 DAB CD Boombox Firmware Update

What you’ll need:
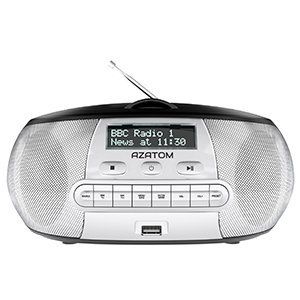
Zenith Z1
A compatible Windows computer with a USB port
A USB Memory Stick
Disclaimer: Following the instructions provided incorrectly can result in your device becoming unresponsive and unusable. Using an older version of the firmware can result in your device becoming unresponsive and unusable. Using the incorrect firmware version for this device can result in your device becoming unresponsive and unusable.
If any incorrect procedure / firmware / firmware version is found to have been applied to the device, you could be subject to a repair charge if the device becomes unresponsive and unusable.
By continuing you agree it is at your own risk.
Now we’ll walk through the process of updating the firmware on the device. Please follow each step carefully as doing this process incorrectly (skipping steps, using incorrect firmware etc.) could render your device unusable.
Click STEP 1 to begin:
Download the firmware using the link at the bottom of this page or by clicking this text.
Note the firmware version shown on the screen of your device and compare it to the current listed version. If the version on your device is the same or newer, please do not update your firmware.
To check your current firmware version on your device:
- Turn on your Zenith Z1
- Open the lid of the CD player fully
- Set the source (using the souce button) to DAB Radio
- Once “Welcome to DAB” appears on the screen, press and hold the “Play / Pause” button for 5 seconds
This will display the current firmware version of your Zenith Z1, if this version is “P 24” or under – Please update your firmware
Open a new window and navigate to your downloads folder
(or where ever you have saved the firmware file named “CDCombo.bin”)
Usually downloaded files automatically go to your “Downloads” folder.

Copy and Paste the selected firmware to the device, you can do this one of two ways:
- Right click on the firmware file and choose “Copy” from the right click menu (or select the file and press “CTRL+C” on your keyboard), then navigating to the device in your Explorer window – opening the device and pasting the firmware device by right clicking inside of the device window, and choosing “Paste” from the right click menu (or by pressing “CTRL+V”).
- Dragging the firmware file from the folder is is currently sat in and placing it directly on top of the device to copy it directly into the device.

Now eject your USB memory stick and remove it from your Laptop or Desktop PC
- Insert the USB memory stick you’ve just loaded with the Firmware Update file into the front of the Zenith Z1 and power on unit using the POWER SYMBOL button
- Open the lid of the CD player fully
- Using the SOURCE button, cycle through the source menu until you get to USB
- The Zenith will then read the USB memory stick and display some information on screen
- Now press and hold the STOP SYMBOL button for 5 seconds until you see the word “UPDATE…”
- This will last for around 60 seconds – you must not power off the Zenith Z1 during this process!
- Once the update process is complete the screen will dim and display 00:00 (or current time)
- The firmware has sucessfully been updated – you can remove the USB memory stick now and use the Zenith Z1 as normal
Now the firmware has been updated sucessfully – Your device will have restarted correctly and will function as if a factory reset has been performed, this means you’ll need to retune it for any radios stations etc. and reconnect to it via bluetooth devices if applicable.
Click here to download firmware – Latest Version: P29
- Turn on your Zenith Z1
- Open the lid of the CD player fully
- Set the source (using the souce button) to DAB Radio
- Once “Welcome to DAB” appears on the screen, press and hold the “Play / Pause” button for 5 seconds
This will display the current firmware version of your Zenith Z1, if this version is “P 24” or under – Please update your firmware
If you are unable to follow the steps above or have enoutered any issue with the firmware update process please call us on:
+44 (0) 1740 629 901 or email us at [email protected] for additional support with your product.